Tuesday, August 11, 2020

Beginning Backstrap Weaving #2

 Beginning Back-strap weaving #2, 


A 17 thread band with a central flower


What you will learn


Using multiple colors

String heddle

How to read a warping pattern/plan

How to shorten the working length as you weave so you can reach the edge (Fell) of your weaving

Locking the shuttle thread into your weaving, both beginning and ending

Weaving plain un-fringed edges.


Tools and materials


Smooth worsted weight fiber (cotton is great)


Set of chop sticks, or 2 pencils for lease sticks

   These will keep your cross intact until the shed stick 

   and heddle Rod are in place and secured


2 rubber bands, to secure the ends of the Lease sticks (2 pencils or chop sticks)


2- @12”-14” dowels (wooden spoon handles?)

   One for the tension rod 

     (Which will be secured to your belt by 2 - 6” loops on your belt)


   The second, to shorten the warp

     (to roll up woven band so you can reach your woven edge)


3 pencils

   Short one for string heddle (in front of the cross); 

   Short one for the shed stick (behind the cross)

   Long one for the warp rod (back end of the weaving 

      (so it can be lashed to a stationary object))


Cardboard shuttle


Beater or fingers and shuttle may be used

   (6” ruler, smooth popsicle stick or tongue depressor)


Ruler/tape measure


Scissors


Winding the warp:


For a delicate headband:


Place the C-clamps tail end up,  50” apart. 

Or use chair legs of an upside down chair or table 

(legs must be perpendicular to the floor)


Use the same procedure from the last band. 

     Always form a cross in the middle of the threads as you wind them on.  

     Remember to always go around your warping post from the same direction. 

Come around the front , go around the back.


(The video shows how to use a warping board.)


We are going to have color changes in this band.


Here is the warping plan: 

Remember, when weaving one thread is down, while the next is up. 


That is the key to reading this chart.


Start on the left.


 The first thread is a background thread. (Bottom line.) 


   tie on the background color to your peg. 


 Read kitty-corner up. The second thread is a back ground.


 Kitty-corner down: the third thread is a background thread


 Kitty-corner up: the fourth thread is a background thread.


Kitty-corner down: the fifth thread is a flower color.  Leave about an 1 1/2 extra at the peg. Cut the background color, tie on the flower color. Warp to next peg


So wind 2 full circuits of background thread. This gives you 4 warp threads of background color.


 Kitty-corner up: the fifth thread is a flower thread. 


Weaving traditional backstrap using string heddles, the best way to do your color changes is:


 to cut and tie on the next color each time there is a change. 


Leave about 1 1/2” extra when making the cut. 


Then use an overhand knot to tie on the next color. (The cuts always happen at the post (c-clamp, or leg of chair...)


Be sure to maintain the cross as you continue cutting and tying on different colors.


Tie a knot (tie to the last knot made) 


Put the chop sticks through the cross (one on each side)


Secure the ends with rubber bands.

(This secures the cross) 


————————————


Secure each end of your warp by tying a thread through the loop formed at the turn

I use a half bow that will come out easily when I want it to.


When the cross and ends are secure:


Take the warp (all the threads you wound) off the pegs, clamp, chair legs....


Put the pencil through and lash to a stationary object.

   A ladder back chair is ideal! A bed frame also works well. 


         Your warp should be at an angle. Either up or down. 

         Try both and see what’s more comfortable for you. 

   Since this warp is very narrow, You may just put this end back around one c clamp and use that as your holder while you weave. As explained below. An extra stron loop thread may or may not be needed.


Tension the threads: 


On top of a table,


at the end with the overhand knot, pull a strong string through the center of all the threads (the loop created by the threads doing a turn around.)


make a loop in that string and loop it back around the c-clamp or door knob

     (For very tiny warps, just leave the one end on the c-clamp)


Then tension, gently pull the threads At the opposite end (the other end ) so the tension is even on all of them


tie another overhand knot on the open end.


Normally I Slide a 12-14” dowel through this end and center it. 

You will be connecting this end to your belt.

The dowel is necessary to shorten the warp to bring the fell line (the working edge of your weaving) closer to you. A second dowel the same size will be needed when bring the fell line closer.


—————————————


Prepare your string heddles. 7 needed.

   If in good shape, use the 5 from the first project and make 2 more.

   (Tie a strong, lightweight, non-nylon string around the width of your phone for each heddle) (nylon will not hold a knot)


Make 2 - @6” loops from heavier cording. 

Put these onto your belt, one on each side of the buckle


——————————————


Setup for string heddles - Heddle rod or stick


Insert dowels in both openings on either side of the cross: easiest done on a table top - (I have a small table I can slide under my weaving when I need it.)


Tie a string from end to end on the dowel closer to the back. This is the shed stick. A short smooth pencil works fine. Secure a thread over the warp with rubber bands, or use half hitches to keep it in place.

This ensures it can’t come out.


Spread the warp out on the front rod keeping all threads in order. 

(Once the heddle rod is set up and secured, this rod will be removed.)


Prepare the string heddles. You will need 8. 

Wrap a piece of strong fiber around a book or something your phone and tie a knot.


All loops should be the same size.


Now take one string heddle (that’s the loop you just created)


Slide it under the first warp thread and pull the ends of the heddle up forming a cradle for the warp thread.
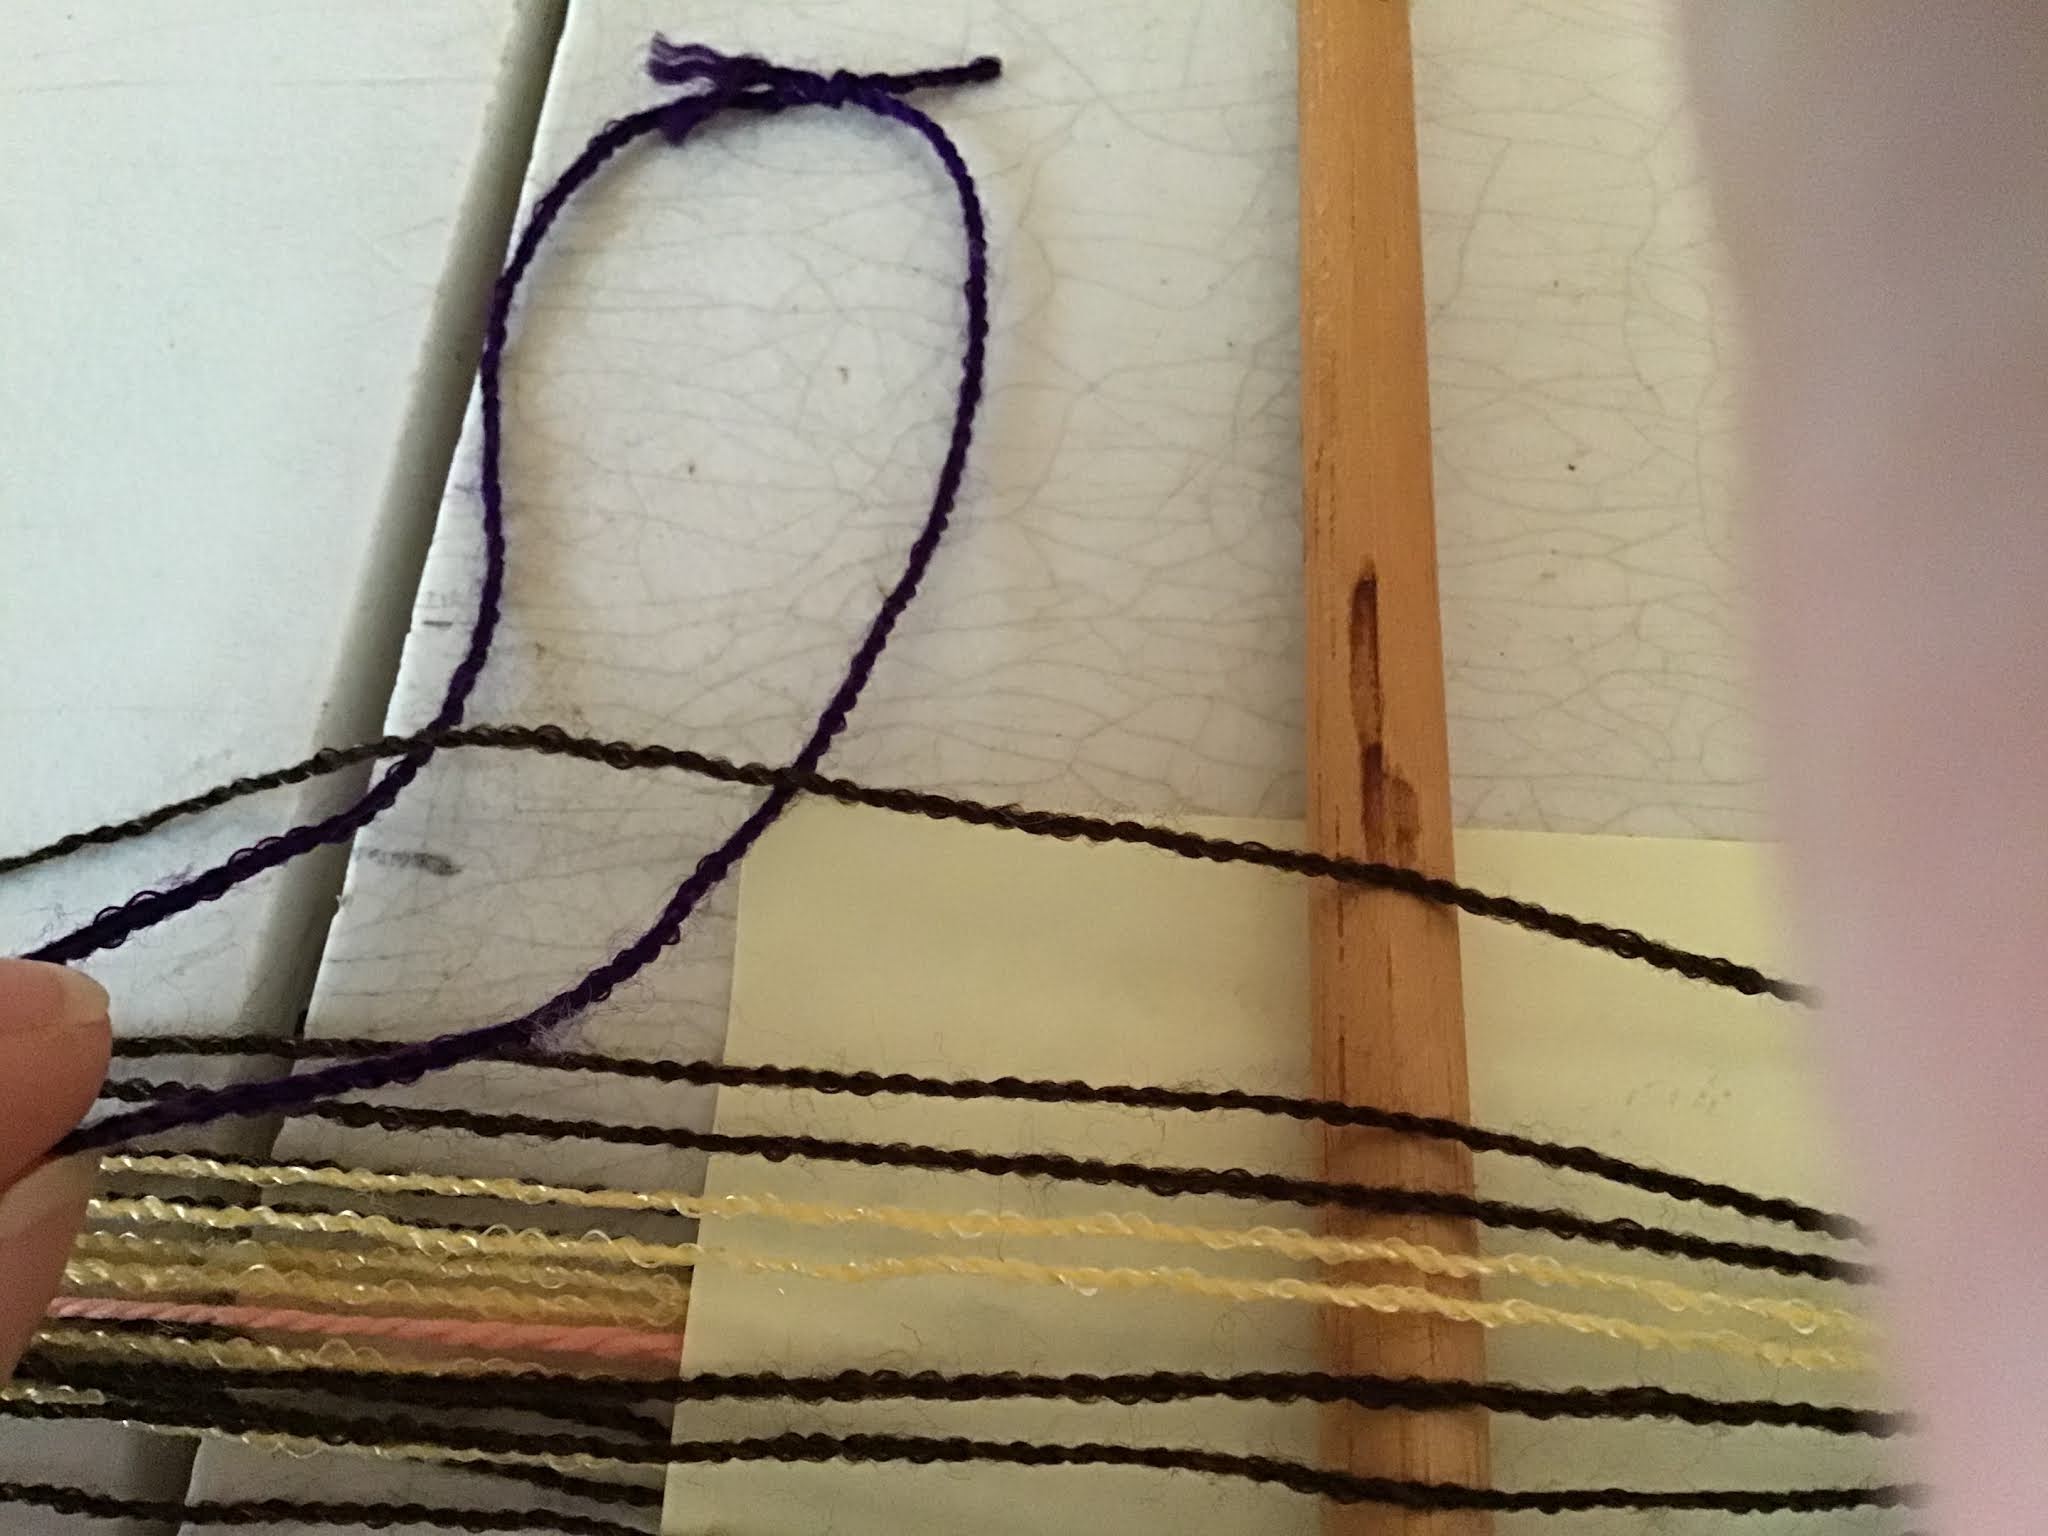


Then slide it onto a short dowel or pencil.


Do this with the rest of the heddles, one at a time, taking each warp thread on top of the dowel in order.


Once all the heddles are on the heddle rod - your dowel or pencil - secure them there with tape or a strong cord tied around one side, over the top and secured on the other side.


Your heddle rod is ready and you can take the long dowel below it out as it is no longer needed.


Connect the 12-14” dowel at the bottom of the weaving to your belt with the loops. Shoestrings work well for these loops.


Be sure your warp isn’t twisted, and that the heddle rod is on top Of the warp and the shed stick is in-between the warp.


Prepare your shuttle.


Push the shed stick away from the heddle rod.

Lean forward, pull up on the heddle rod. 

This will open the shed. 

Pass the shuttle through leaving a short tail. 

Pull it down to where you want your weaving to begin.


Bring the shed stick to the heddle rod.

Lean forward.

Pull up on the heddle rod


As long as your heddles are long enough, the second shed will open.

Pass the shuttle through AND the tail of the weft from the last row.


Change sheds. 

Push the shed stick away from the heddle rod

Lean forward

Pull up on the heddle rod

Beat the weaving, pass the shuttle

Catch the loop formed when the shuttle passes through the shed with your pinky

Gently pull this loop and the shuttle thread toward your body. (This controls the width of your weaving)

Pinch the weaving at the fell line (edge of the weave) with the thumb and index or middle finger

Gently pull the rest of the shuttle thread through while letting go of the loop.


If this doesn’t make sense, watch the video. DPC Fiber Arts, Beginning Backstrap Weaving #2


Once you have this technique down, you can do wider pieces. The skies the limit. Go to town. 


The next post will be about using a rigid heddle with the backstrap. I use it when doing pick-up patterns.


Weaving without Cut Ends

This is accomplished in a couple different ways and setup needs to be done under tension

You don’t want your fiber getting tangled; so connect to your back-strap.

Method one

 First place the warp on a thin metal rod, like a coat hanger or bicycle spoke.

The metal wire is tied to a dowel at center, thirds and at the ends. When weaving is completed, the wire can simply be pulled out and maybe a fiber run through the opening, but wet finishing will usually make the little space disappear.

Method two


Another way - again under tension) is to put the warp on a dowel, spread it out evenly.

Tie the First dowel to a second dowel at the ends. Make this an easily removable knot. 

Tie a strong fiber To the End of second Dowel; 

then run the fiber through the middle of the warp created by the first dowel, securing it firmly at the other end. Only tie to dowel #2

 Spread  the warp in even sections

Lash the thread going through the center of the warp to the dowel. Get it even and tight. 

This completed, untie dowel 1 from dowel 2 and remove dowel 1.

Finally spread the warp evenly. 

Do this to both ends. 

So now you have the basics of Rigid heddle weaving with a rigid heddle.

You can take this project and make it wider by adding plain rows between two edgings of the pattern, or repeat the pattern A few times across the warp. You can also invert the flower design every other repeat. 

Try varying the color of the flower in the repeats. So many possibilities!

With the knowledge you have now, the size of your rigid heddle is the only limitation, or 

If you work with a string heddle, then the length of your dowels and the spread of your arms is your width limit. 

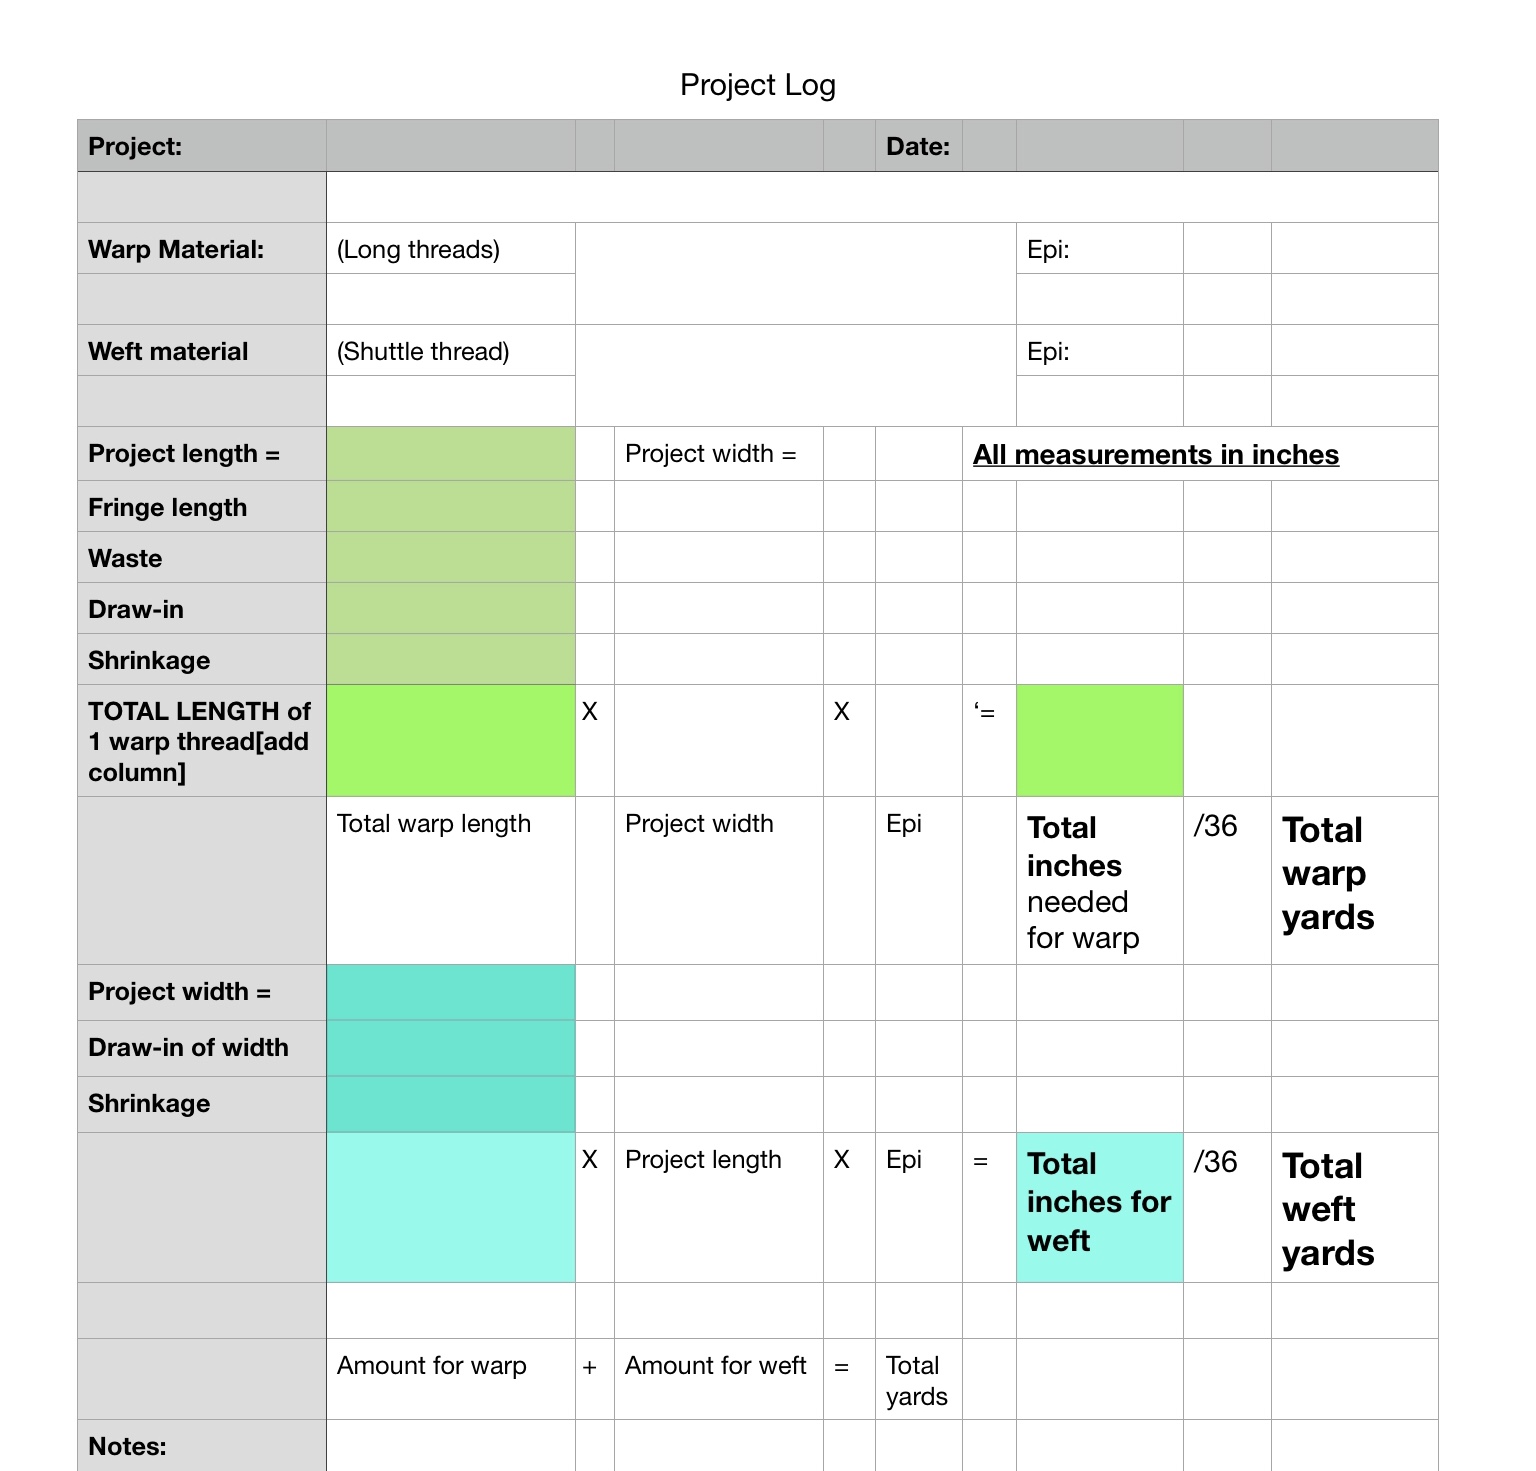
Calculating your warp and weft is all covered in the first backstrap post.


Stay tuned!  Hope this was helpful.


Here are some more ideas for you!


Sunday, August 9, 2020

Overshot Scarf

 Between instructional Band Weaving videos, I decided to do a scarf in overshot to continue my quest of using up my stash so as to move on to natural fibers. The plan was simple. I had two skeins of acrylic and polyester yellow and one in a darker gold. Perfect! So the plan was:

12” x 60” plus fringe. At 15 epi (ends per inch) 191 warp + floating selves es

Entire piece in Maltese Cross Overshot pattern - J. Estes miniatures book 2 from handweaving.net, docs.

Best laid plans don’t always work out. Turned out 10” in I realized I didn’t have enough weft fiber, so....I had to rethink the pattern. Half way through I thought I had calculated wrong so pulled out 8” and added 6” of brown before weaving the center again. It turned out beautiful surrounded by 1 1/4” of gold plain weave. Then another 20 3/4” of brown and another 1 1/4” band of gold and the three repeats of the overshot pattern, only two repeats were possible in the same length as the beginning due to the tension situation. I found out that I couldn’t hold the tension on the end of the warp. So the back end is not the same as the beginning. I also didn’t look at my notes before making the change in length at the center. I won’t make that mistake again. Waste on this was only 4”. Which I would normally be really happy about as I don’t like wasting material, but I now know it’s necessary to keep the tension even at the end.

Even with the errors, I learned quite a bit and it is pretty I think.

I do have a technique to share with you. When I’m going to have fringe I like to use this finish. So I also start And finish with this crochet edge. At the beginning it also helps even out the gaps in the warp.

Start with a slip knot. Your yarn will be held on the opposite side of the weaving from the crochet hook. Then crochet a line across the warp. Do it up near the reed so it goes on nice and even and smooth. Not to tight; you don’t want to change the width of the warp. I put 3 warp threads between each crochet stitch. Use the reed to gently pull the crochet line down to the fell line (front edge of the weaving)  If you use a contrasting color it looks really great! When your project is finished, tie the fringe by taking two or three sets of threads for each fringe knot.  Take a look at the contrasting line by the fringe. (Below)

here is how it turned out.


Wednesday, July 22, 2020

Beginning Backstrap Weaving documents

Materials needed:
2 long pencils
1 shorter pencil
Strong fiber: @70” (heddles)
@6-7 yards of smooth cotton yarn. Worsted weight will be easier to work with than #10 crochet cotton.
          However, this will be only a 10 Thread project. Polyester and acrylic may work, 
          but my experiences have shown then to want to felt (threads sticking together while weaving.
6” Ruler Or popsicle stick (beater)
Non corrugated cardboard for shuttle : 3.5 x 1.25” punch a hole on one side toward one end.
Scissors
Tape measure
2 - 2.5 or larger c-clamps, or straight chair legs - for winding the warp.
Short lengths of string/yarn to tie ends and the cross
Doorknob or other strong stationary object to lash your weaving to. Ladder back chair; bed frame; railing
Sturdy belt
3” 
loop of heavier cord: secures the weaving to your belt to weave


These are the information slides and project log to supplement my YouTube video: Beginning Backstrap Weaving. Hopefully they will be helpful.


I find weaving to be very relaxing and calming. It teaches many things: patience, focus, staying in the moment, clearing/quieting your mind, self esteem, self confidence, staying in your own business (this is so important for you to live YOUR life), critical thinking, detailed thinking, math,  goal setting and steps to achieve your goal, critical thinking, eye hand coordination, color sense, and more. 


When I first started weaving, bands were it! I still love weaving beautiful bands. I began with a little rigid heddle that I purchased from Mariya Popova of Handweaving tools on Etsy. Wonderful lady to work with. As she is in Russia and I was in Texas it took 3 weeks for my heddles to arrive. I got the small one, 31 holes and the Big one 121 holes I believe and enjoy using them. I also got two shuttles from her again, small and large. Your shuttle should be about the same width or slightly longer than your weaving. Unless you’re making a tiny band, then let it be comfortable in your hand. 


The rigid heddle is a wonderful tool and very easy to work with. I still wanted to learn traditional backstrap weaving, but information on how to was slim. There are some good videos out there now and I’m grateful for them. I’m hoping my offering will have something that was eluding you.


Our society seems to be consumed by competition. Don’t let this flow into your weaving. Don’t compare your work with others. You are just learning; they may have been doing this for years. Instead, compare your second piece to your first. What has improved? What have you learned? Applaud yourself for what you have achieved and learn from mistakes. Mistakes are simply stepping stones to help you learn and improve. If you need to compare, always do it within your own work.


In weaving tension is your friend. Never leave your threads slack for they like to tangle up with their neighbors! This small piece is not excluded. Be very careful to keep it stretched out. I suggest using a heavy or large fiber to begin with. It’s easier to see what you are doing. A smooth fiber is best. Don’t use something that likes to felt (stick together) if you find it sticking together and making it difficult to open your sheds, try spraying it with water before you give up. Crochet cotton makes a beautiful project. I like working with #10, but for learning begin with something much heavier. That’s why I’m suggesting a worsted weight.


This band is a warp faced weave. That means the warp (long threads that are tied to your backstrap) are pulled together so the weft (thread on your shuttle) doesn’t show except at the edges. There is much to learn with this first piece! Keep it small and short. Consecutive videos will add to your abilities.


Pay very close attention to the technique I use when pulling the shuttle thread through the warp. Even edges are your goal. It takes time, practice and patience to achieve them.


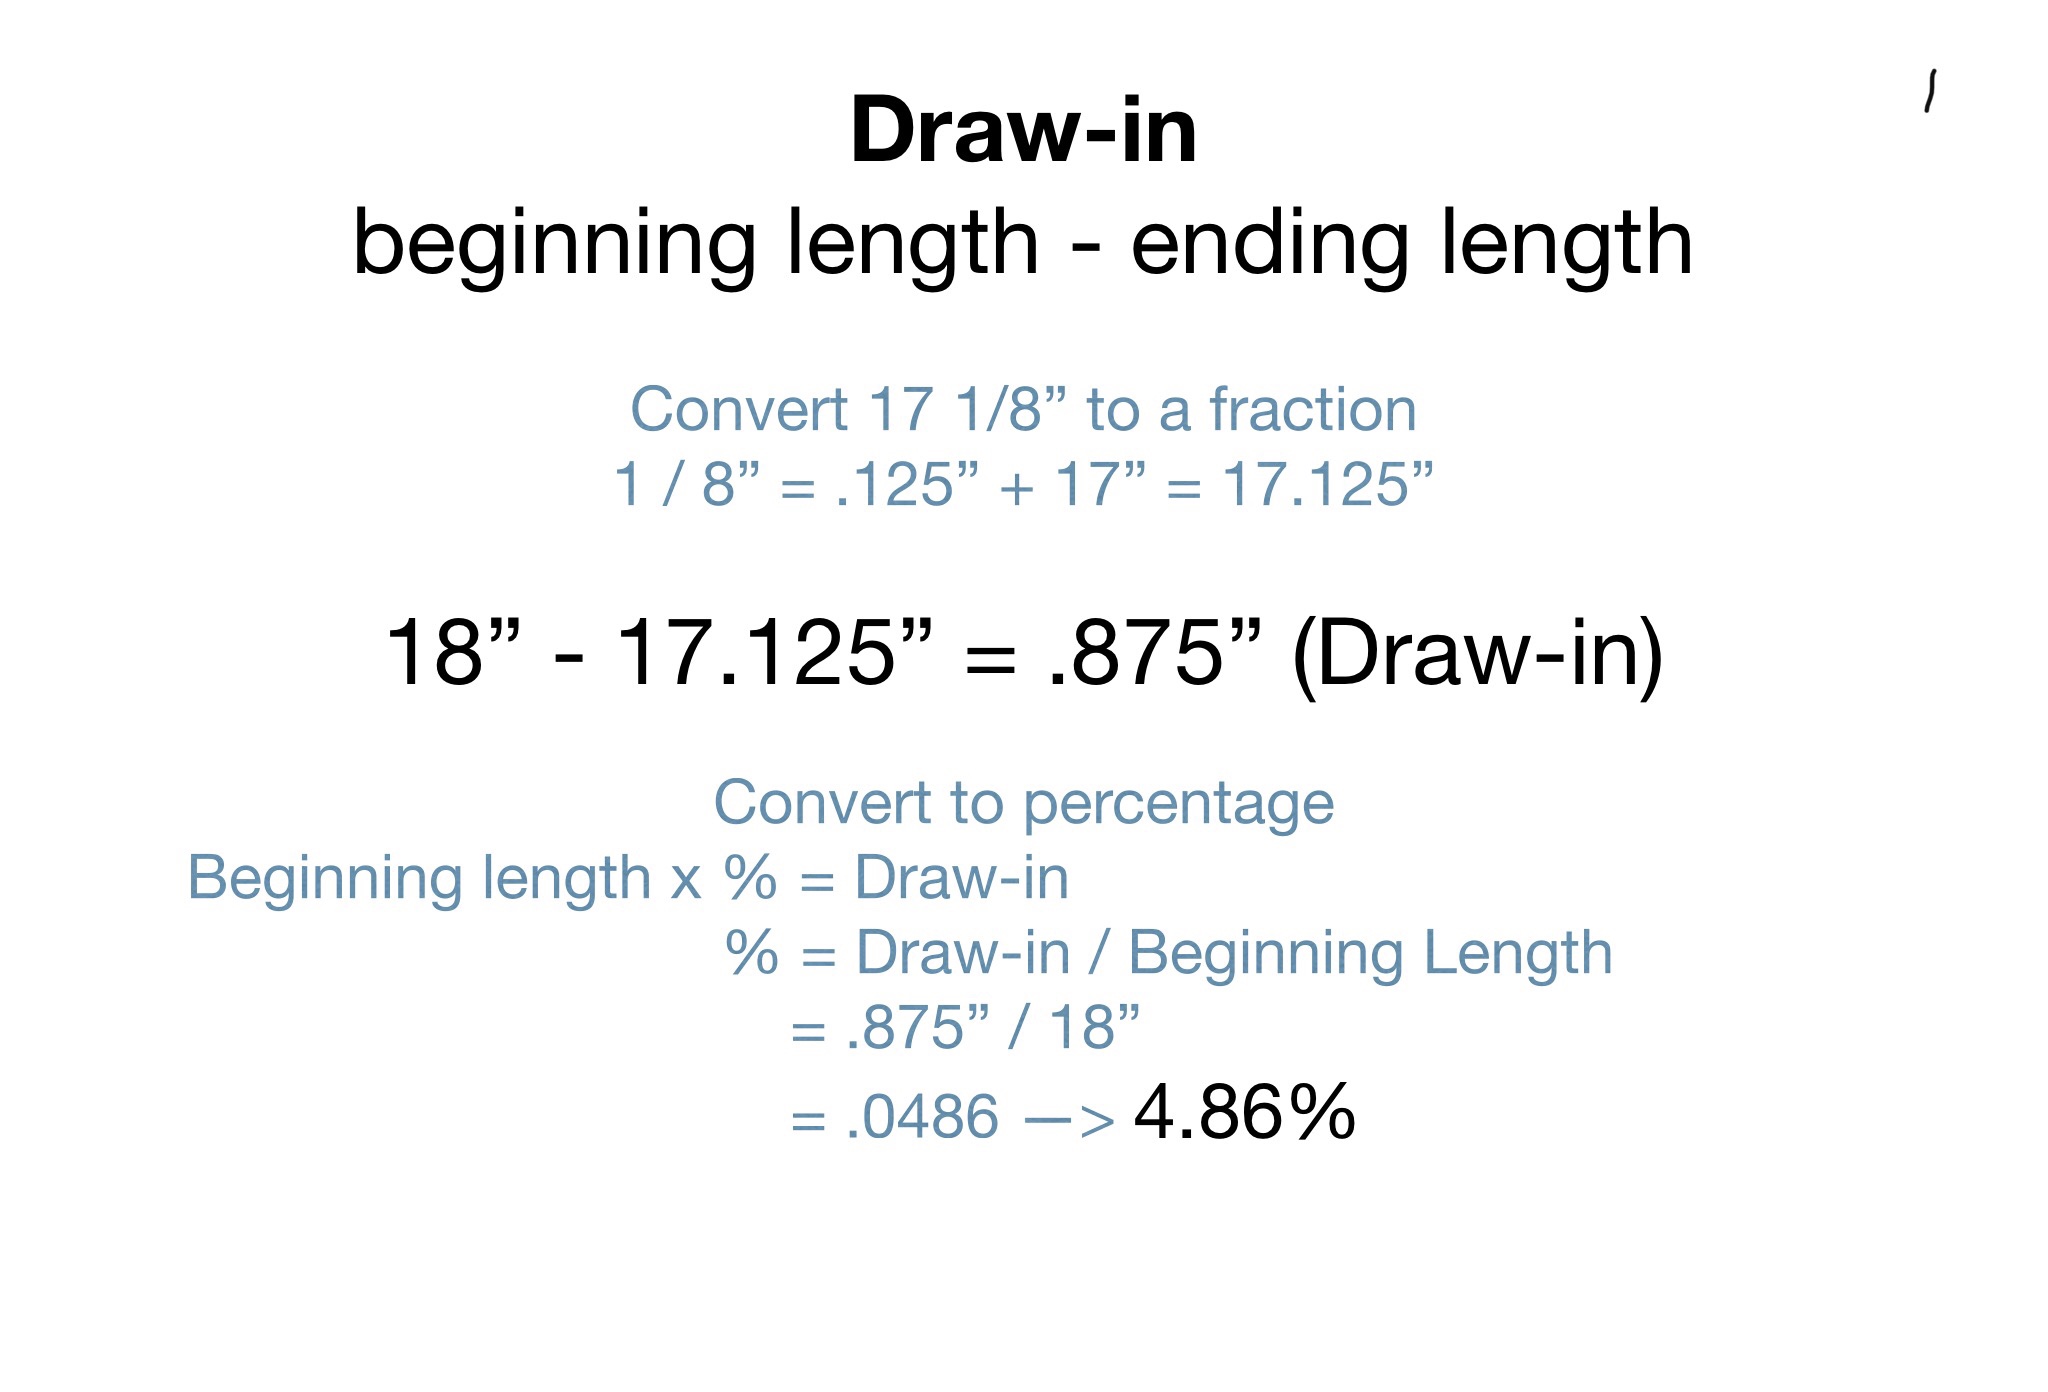
Weaving is a wonderful activity for homeschoolers as well. It can be tied in with studying history, social studies, English, math, and of course, art. There are many calculations that go into planning a piece of weaving. For example: this piece has 10 threads, 18” long. That’s 10x18=180” the weft (shuttle thread) is 7/16’s wide - (we’ll say 1/2” to simplify it), 7” long and there are 6 rows to the inch. 1/2 x 7 x 6 = 21”  if you are using the same fiber for warp and weft you get 180 + 21 = 201” / 36” to a yard (the common measurement for fiber) equals 5.58 or approximately 6 yards to make this project. There are more calculations to take into consideration for future projects including draw-in, fringes, shrinkage and all are important. I’ll include a blank project sheet at the end on the video along with some notes. It’s very important to keep good records on each project in a notebook. They will be invaluable as you continue weaving! Have fun! 😊


More information is on my YouTube video: Beginning Backstrap Weaving

Happy Creating!

Tuesday, July 21, 2020

New learning videos!

So many changes since my last post! Home sale, my mom passed in January and 3 days later our new home was set to close (and did) in Florida. Moving while mind and body numb. Ah, and then the pandemic! And in the midst of it all, the arrival of our first grandchild, so there is light! So much beautiful light coming to me and from within me! 

To keep my mind clear and fear of the chaos the world is currently in at bay, I’ve been weaving. It is a very good place to be. Here, at home, and in the now moment. I’m missing sharing with others, but fortunately the internet is a remedy. I’ve begun posting videos on both of my YouTube channels. Deborah Peters Creations, and DPC Fiber Arts. The first with lullaby’s that I am writing for our granddaughter. The second with teaching videos. 

The first teaching video is a journey into backstrap weaving using common household items: pencils, cardboard, a popsicle stick or 4” ruler, acrylic yarn, or if you have it, cotton. Only 10 threads. In the video I’m using C-clamps to wind the warp, but a chair turned upside down works as well. Just be sure the legs are parallel and about 18” apart. A belt is used For the backstrap and a doorknob as the stationary strong elevated connection point.

We’re making a 7” long x almost 1/2” wide band that could be a bracelet or whatever else you would like to use it for. The video is silent. Watch and follow. If this silent format isn’t best for your learning style, let me know and I can go back to talkies, but silent watching bridges all language barriers. I do have written notes both in the information below the video and at the end of the video, but close observation should be enough for you to learn this method. Also, please feel free to comment on likes, suggestions, etc. 

BTW, the tatting videos have not been abandoned. They will continue after I get some of these done!
Happy Creating!

Tuesday, October 1, 2019

Building a foldable loom

Amazing how fast time passes! I’ve been weaving for quite a few months now and loving it. When I decided I wanted to weave, I searched for loom plans. Finally, I took dimensions and ideas from a few different looms and designed this one.  Why folding? So it's portable and you can go and weave with friends or go to a class, or go weave in the woods or at the beach...….

 Before you begin, READ ALL THE INSTRUCTIONS! You need a thorough understanding of how the loom works before you start cutting wood!

Also, if you can afford to buy a loom, it will save you many hours of work. There again, if you enjoy fiddling with tools and such, here ya go!

Although you can weave using just heddle rods on the heddle rod supports, a rigid heddle is easier to work with. I got my rigid heddle from a wonderful lady in Russia who sells on etsy. Here is her link:

https://etsy.me/2nvLGFl

It is a 125 hole rigid heddle made from birch plywood. Also get several of her large shuttles. They are very nice to use and are inexpensive. From her address in Russia to South Texas it only took three weeks, and the quality of her products are very high! It’s wonderful to use a wooden heddle. Note: this heddle is for fine fibers, not bulky or worsted weights. It is just over 12” long, so the frame we are going to build is @15” wide inside.

My looms are built mainly from scrap materials, so dig around and see what you can find.

It is very possible to weave without the rigid heddle, and complex weaves can be made using more than 2 heddle rods. That information saves you money. The rigid heddle makes the setup easier though.

To build the loom you will need:

1 - 12”rigid heddle, or 2 or more heddle rods (3/8” or 1/4” dowels) heddle rods need to be 17 1/4" long

Frame (3/8" or 1/2" plywood)

2 - 1" x 2" lumber - (cut 1 - 15 1/2", cut 1 - 15") these are the braces that hold the loom together. They get 2 screws in each end. It is very important to get these lined up exactly to keep the loom square.

1 - 4' x 1" dowel (cut 2 pieces - 17", 16 1/4")

Heddle supports (5 gallon paint bucket stir sticks work great!) 9 1/2" x 1 1/2"

optional: heddle rod holders - 20* angle on one end. From point to top = 6 1/4"
on flat end leave 2 ears @ 1/4" high and cut out between to hold heddle rods while weaving (see picture)

1 rigid heddle holder rod - 3/8” or 1/4” dowel x 15 3/4" long (tied on to the rigid heddle so it will hang from the heddle supports.) IF USING A RIGID HEDDLE

Lief rods (cut 1 -15", cut 1 - 14 3/4") these are connected by nylon string to the rollers. This is what you connect your weaving threads to.

Beater (stir stick or floor trim or other thin strong wood @ 16 - 18" x 1/2"-1" and sanded on one side)

Pick-up stick (nice to have 2 or 3 of these) (3/4" - 1 1/4" wide x 14 1/2" long x @3/8" thick)

And at least one shuttle. (A dowel can also be used as a shuttle - @15 ")

Heavy Nylon string for connecting the lief rods to the rollers and for creating string heddles if using heddle rods without a rigid heddle.

4- 1 3/4” #6 bolts and wing nuts

10 - 1 1/2"- 1 3/4" screws

2 - 3/4" -1" #6 bolts and wing nuts


For the parts of the frame you will cut 4 pieces. 2 for the front, and 2 for the back.

Make a pattern:
these 2 pieces form the front of the frame
1. Draw a line 12.5" long. (this line is the top of the frame)

2. With a compass set to 1.75" Put the point at the end of the line and draw a circle.

3. Do the same on the other end of the line.

4. With a straight edge, draw a line from the bottom of the circle at one end to the bottom of the circle on the other end. (this edge is the bottom of the frame)

5. Where the original line meets the circle, round it out to make a gentle curve. see picture.

6. Cut out 2 of these. Be sure the center of the circle is marked.

For the back of the frame, repeat the above steps except, draw the line 8.5" long.


Cut the 4 pieces out of either 3/8 or 1/2" plywood.
Drill a hole through all 4 pieces in the exact center of the circles.
Depending on the size of the bolts and screws you are using, the holes on the two ends may be different sizes.

Check the picture.

One end of each piece will be in the center where the loom folds. This end will get a bolt and wing nut.
The other end of each piece will hold the 1" dowel. This end will get either a screw hole, or a 1" hole drilled through it.

Use a bit that allows the bolt to easily pass through. You don't want a lot of give, but the frame pieces must be able to easily slide past each other in order to fold the loom up. Same for the screw end. The screw acts as an axel and allows the dowel to roll.

Peg Holes: My loom was the prototype, so these pictures show 6 peg holes around the 1" center hole. The pegs  hold the warp tension. I found the 6 holes are not enough. Instead, get some large rivets  and drill 12 holes the size of the rivet around the 1" hole. You will need to shorten the rivet to protect fingers and fiber. I used a cutting disk on my dremel while holding the rivet with a pliers. Then just sand the cut end after it cools. You'll need 2 rivet pegs; one for the front and one for the back. I made a couple extra incase they get lost or used as a cat toy...

To mark the peg holes: before drilling the 1" hole, draw a ring around the center point out @3/4" from center. Then, using a ruler which crosses the center point, mark a point on either side of center on the line. Then mark 2 more points with the ruler perpendicular to the first set of 2. Then you can eye it to divide each space between points with 2 more points.


At this point I want to stress that the loom MUST be square. If it is not, your weaving won't be either!

So when drilling holes, drill through both front frame pieces at the same time (clamp them together so they can't move); then drill through both back frame pieces at the same time, etc. A small drill press is very handy.

Drill a starter hole in one end of both dowels. This is where the screw goes.

Wait to drill the hole through the other end of the dowel where the peg goes through. That is your tensioning device. Don't drill that until you have the frame together so you can see where to put the peg hole. The peg has to be out from the frame @1/8" so that it will be stopped by the rivet peg.

Assembly: Start with the long front pieces. Drill the starter holes for the frame supports. then screw the longest 1x2 into place between the two front pieces.

2. Do the same with the 2 back frame pieces (the shorter 2). Use the shorter 1x2 and after drilling starter holes, screw it into place.

3. Now connect front to back with a bolt and wing nut. Obviously the front goes on the outside and the back goes on the inside.

4. Make the Rigid Heddle support - even if you're using heddle rods, you will use this. The cut outs are large enough for the dowel to easily be placed into them. The positions are Up, Neutral, and Down. Drill the holes, then cut the opening slots and sand. Notice the angle on the slots. The dowel must not slip out of the holder slots.


5. Drill the hole that connects to the center bolt. It is located almost at the 2" mark of the tape measure in the above picture. Notice it is not in the middle. The hole at the 3/4" mark on the tape measure is the hole that locks the loom into working position.

6. Most Important Line!  When weaving, the loom sits in your lap and sets on the edge of a table. That's what the cut-outs are for on the bottom of the back pieces. The front and back pieces are locked into an angle.

Lay the loom on its side: from the bottom of the front side of the loom to the center of the back side is 6". That is where it must be locked into place. So the second bolt is placed so that it goes through  front, back and the rigid heddle support. Note the rigid heddle support is perpendicular to the floor when the loom is in weaving position. A picture is worth a thousand words, or several pictures.


7. The Dowels can now be inserted in the 1" holes. Sand the holes a little bigger if necessary and don't screw them in until you put the tension pegs in. the pegs should stick out of the dowel @3/4" on either side and be @1/8" away from the outside of the loom. When you insert the screw to the opposite end, leave it loose enough for the dowel to turn freely.

8. Finally, if you are going to install the Heddle Rod holders, they sit on the cross pieces (1 x 2's) of the loom. They do not have to be tight as the tension of the rods will hold them upright, so one small bolt and wing nut in each is all they need.


Heddle rods, beater and pickup sticks:


Here are a couple more pictures to help with assembly.


Sand all the parts very smooth. No fun when the fiber gets caught on something! Check out YouTube for great teaching videos! Evenually, I'll get some out there too, but no sense recreating the wheel.
Have Fun!

Let me know if I made any blunders in my explanation!