Amazing how fast time passes! I’ve been weaving for quite a few months now and loving it. When I decided I wanted to weave, I searched for loom plans. Finally, I took dimensions and ideas from a few different looms and designed this one. Why folding? So it's portable and you can go and weave with friends or go to a class, or go weave in the woods or at the beach...….
Before you begin, READ ALL THE INSTRUCTIONS! You need a thorough understanding of how the loom works before you start cutting wood!
Also, if you can afford to buy a loom, it will save you many hours of work. There again, if you enjoy fiddling with tools and such, here ya go!
Although you can weave using just heddle rods on the heddle rod supports, a rigid heddle is easier to work with. I got my rigid heddle from a wonderful lady in Russia who sells on etsy. Here is her link:
https://etsy.me/2nvLGFl


Cut the 4 pieces out of either 3/8 or 1/2" plywood.
Drill a hole through all 4 pieces in the exact center of the circles.
Depending on the size of the bolts and screws you are using, the holes on the two ends may be different sizes.
Check the picture.
One end of each piece will be in the center where the loom folds. This end will get a bolt and wing nut.
The other end of each piece will hold the 1" dowel. This end will get either a screw hole, or a 1" hole drilled through it.
Use a bit that allows the bolt to easily pass through. You don't want a lot of give, but the frame pieces must be able to easily slide past each other in order to fold the loom up. Same for the screw end. The screw acts as an axel and allows the dowel to roll.
Peg Holes: My loom was the prototype, so these pictures show 6 peg holes around the 1" center hole. The pegs hold the warp tension. I found the 6 holes are not enough. Instead, get some large rivets and drill 12 holes the size of the rivet around the 1" hole. You will need to shorten the rivet to protect fingers and fiber. I used a cutting disk on my dremel while holding the rivet with a pliers. Then just sand the cut end after it cools. You'll need 2 rivet pegs; one for the front and one for the back. I made a couple extra incase they get lost or used as a cat toy...
To mark the peg holes: before drilling the 1" hole, draw a ring around the center point out @3/4" from center. Then, using a ruler which crosses the center point, mark a point on either side of center on the line. Then mark 2 more points with the ruler perpendicular to the first set of 2. Then you can eye it to divide each space between points with 2 more points.

At this point I want to stress that the loom MUST be square. If it is not, your weaving won't be either!
So when drilling holes, drill through both front frame pieces at the same time (clamp them together so they can't move); then drill through both back frame pieces at the same time, etc. A small drill press is very handy.
Drill a starter hole in one end of both dowels. This is where the screw goes.
Wait to drill the hole through the other end of the dowel where the peg goes through. That is your tensioning device. Don't drill that until you have the frame together so you can see where to put the peg hole. The peg has to be out from the frame @1/8" so that it will be stopped by the rivet peg.
Assembly: Start with the long front pieces. Drill the starter holes for the frame supports. then screw the longest 1x2 into place between the two front pieces.
2. Do the same with the 2 back frame pieces (the shorter 2). Use the shorter 1x2 and after drilling starter holes, screw it into place.
3. Now connect front to back with a bolt and wing nut. Obviously the front goes on the outside and the back goes on the inside.
4. Make the Rigid Heddle support - even if you're using heddle rods, you will use this. The cut outs are large enough for the dowel to easily be placed into them. The positions are Up, Neutral, and Down. Drill the holes, then cut the opening slots and sand. Notice the angle on the slots. The dowel must not slip out of the holder slots.

5. Drill the hole that connects to the center bolt. It is located almost at the 2" mark of the tape measure in the above picture. Notice it is not in the middle. The hole at the 3/4" mark on the tape measure is the hole that locks the loom into working position.
6. Most Important Line! When weaving, the loom sits in your lap and sets on the edge of a table. That's what the cut-outs are for on the bottom of the back pieces. The front and back pieces are locked into an angle.
Lay the loom on its side: from the bottom of the front side of the loom to the center of the back side is 6". That is where it must be locked into place. So the second bolt is placed so that it goes through front, back and the rigid heddle support. Note the rigid heddle support is perpendicular to the floor when the loom is in weaving position. A picture is worth a thousand words, or several pictures.


Heddle rods, beater and pickup sticks:


Here are a couple more pictures to help with assembly.
Sand all the parts very smooth. No fun when the fiber gets caught on something! Check out YouTube for great teaching videos! Evenually, I'll get some out there too, but no sense recreating the wheel.
Before you begin, READ ALL THE INSTRUCTIONS! You need a thorough understanding of how the loom works before you start cutting wood!
Also, if you can afford to buy a loom, it will save you many hours of work. There again, if you enjoy fiddling with tools and such, here ya go!
Although you can weave using just heddle rods on the heddle rod supports, a rigid heddle is easier to work with. I got my rigid heddle from a wonderful lady in Russia who sells on etsy. Here is her link:
https://etsy.me/2nvLGFl
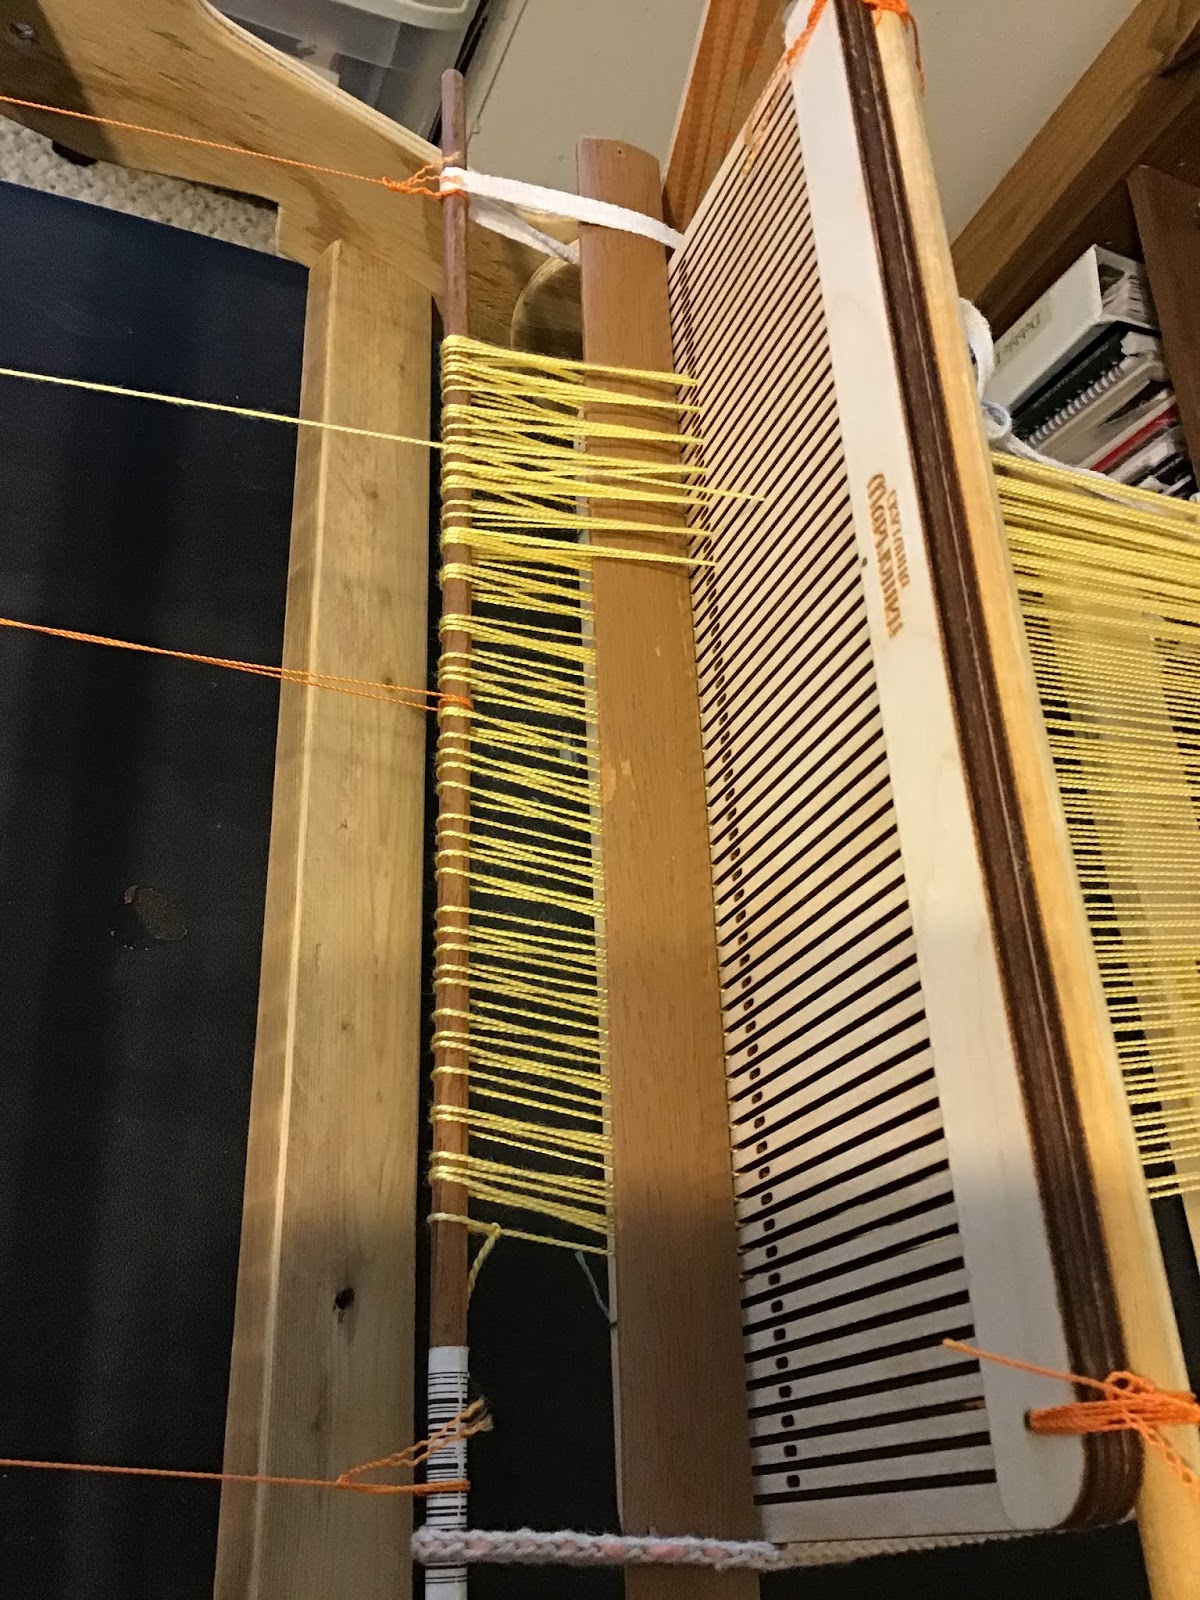
It is a 125 hole rigid heddle made from birch plywood. Also get several of her large shuttles. They are very nice to use and are inexpensive. From her address in Russia to South Texas it only took three weeks, and the quality of her products are very high! It’s wonderful to use a wooden heddle. Note: this heddle is for fine fibers, not bulky or worsted weights. It is just over 12” long, so the frame we are going to build is @15” wide inside.
My looms are built mainly from scrap materials, so dig around and see what you can find.
It is very possible to weave without the rigid heddle, and complex weaves can be made using more than 2 heddle rods. That information saves you money. The rigid heddle makes the setup easier though.
It is very possible to weave without the rigid heddle, and complex weaves can be made using more than 2 heddle rods. That information saves you money. The rigid heddle makes the setup easier though.
To build the loom you will need:
1 - 12”rigid heddle, or 2 or more heddle rods (3/8” or 1/4” dowels) heddle rods need to be 17 1/4" long
Frame (3/8" or 1/2" plywood)
2 - 1" x 2" lumber - (cut 1 - 15 1/2", cut 1 - 15") these are the braces that hold the loom together. They get 2 screws in each end. It is very important to get these lined up exactly to keep the loom square.
1 - 4' x 1" dowel (cut 2 pieces - 17", 16 1/4")
2 - 1" x 2" lumber - (cut 1 - 15 1/2", cut 1 - 15") these are the braces that hold the loom together. They get 2 screws in each end. It is very important to get these lined up exactly to keep the loom square.
1 - 4' x 1" dowel (cut 2 pieces - 17", 16 1/4")
Heddle supports (5 gallon paint bucket stir sticks work great!) 9 1/2" x 1 1/2"
optional: heddle rod holders - 20* angle on one end. From point to top = 6 1/4"
on flat end leave 2 ears @ 1/4" high and cut out between to hold heddle rods while weaving (see picture)
1 rigid heddle holder rod - 3/8” or 1/4” dowel x 15 3/4" long (tied on to the rigid heddle so it will hang from the heddle supports.) IF USING A RIGID HEDDLE
Lief rods (cut 1 -15", cut 1 - 14 3/4") these are connected by nylon string to the rollers. This is what you connect your weaving threads to.
Beater (stir stick or floor trim or other thin strong wood @ 16 - 18" x 1/2"-1" and sanded on one side)
Pick-up stick (nice to have 2 or 3 of these) (3/4" - 1 1/4" wide x 14 1/2" long x @3/8" thick)
And at least one shuttle. (A dowel can also be used as a shuttle - @15 ")
Heavy Nylon string for connecting the lief rods to the rollers and for creating string heddles if using heddle rods without a rigid heddle.
4- 1 3/4” #6 bolts and wing nuts
10 - 1 1/2"- 1 3/4" screws
2 - 3/4" -1" #6 bolts and wing nuts
10 - 1 1/2"- 1 3/4" screws
2 - 3/4" -1" #6 bolts and wing nuts
For the parts of the frame you will cut 4 pieces. 2 for the front, and 2 for the back.
Make a pattern:
these 2 pieces form the front of the frame
1. Draw a line 12.5" long. (this line is the top of the frame)
2. With a compass set to 1.75" Put the point at the end of the line and draw a circle.
3. Do the same on the other end of the line.
4. With a straight edge, draw a line from the bottom of the circle at one end to the bottom of the circle on the other end. (this edge is the bottom of the frame)
5. Where the original line meets the circle, round it out to make a gentle curve. see picture.
6. Cut out 2 of these. Be sure the center of the circle is marked.
For the back of the frame, repeat the above steps except, draw the line 8.5" long.Make a pattern:
these 2 pieces form the front of the frame
1. Draw a line 12.5" long. (this line is the top of the frame)
2. With a compass set to 1.75" Put the point at the end of the line and draw a circle.
3. Do the same on the other end of the line.
4. With a straight edge, draw a line from the bottom of the circle at one end to the bottom of the circle on the other end. (this edge is the bottom of the frame)
5. Where the original line meets the circle, round it out to make a gentle curve. see picture.
6. Cut out 2 of these. Be sure the center of the circle is marked.


Cut the 4 pieces out of either 3/8 or 1/2" plywood.
Drill a hole through all 4 pieces in the exact center of the circles.
Depending on the size of the bolts and screws you are using, the holes on the two ends may be different sizes.
Check the picture.
One end of each piece will be in the center where the loom folds. This end will get a bolt and wing nut.
The other end of each piece will hold the 1" dowel. This end will get either a screw hole, or a 1" hole drilled through it.
Use a bit that allows the bolt to easily pass through. You don't want a lot of give, but the frame pieces must be able to easily slide past each other in order to fold the loom up. Same for the screw end. The screw acts as an axel and allows the dowel to roll.
Peg Holes: My loom was the prototype, so these pictures show 6 peg holes around the 1" center hole. The pegs hold the warp tension. I found the 6 holes are not enough. Instead, get some large rivets and drill 12 holes the size of the rivet around the 1" hole. You will need to shorten the rivet to protect fingers and fiber. I used a cutting disk on my dremel while holding the rivet with a pliers. Then just sand the cut end after it cools. You'll need 2 rivet pegs; one for the front and one for the back. I made a couple extra incase they get lost or used as a cat toy...
To mark the peg holes: before drilling the 1" hole, draw a ring around the center point out @3/4" from center. Then, using a ruler which crosses the center point, mark a point on either side of center on the line. Then mark 2 more points with the ruler perpendicular to the first set of 2. Then you can eye it to divide each space between points with 2 more points.
At this point I want to stress that the loom MUST be square. If it is not, your weaving won't be either!
So when drilling holes, drill through both front frame pieces at the same time (clamp them together so they can't move); then drill through both back frame pieces at the same time, etc. A small drill press is very handy.
Drill a starter hole in one end of both dowels. This is where the screw goes.
Wait to drill the hole through the other end of the dowel where the peg goes through. That is your tensioning device. Don't drill that until you have the frame together so you can see where to put the peg hole. The peg has to be out from the frame @1/8" so that it will be stopped by the rivet peg.
Assembly: Start with the long front pieces. Drill the starter holes for the frame supports. then screw the longest 1x2 into place between the two front pieces.
2. Do the same with the 2 back frame pieces (the shorter 2). Use the shorter 1x2 and after drilling starter holes, screw it into place.
3. Now connect front to back with a bolt and wing nut. Obviously the front goes on the outside and the back goes on the inside.
4. Make the Rigid Heddle support - even if you're using heddle rods, you will use this. The cut outs are large enough for the dowel to easily be placed into them. The positions are Up, Neutral, and Down. Drill the holes, then cut the opening slots and sand. Notice the angle on the slots. The dowel must not slip out of the holder slots.

5. Drill the hole that connects to the center bolt. It is located almost at the 2" mark of the tape measure in the above picture. Notice it is not in the middle. The hole at the 3/4" mark on the tape measure is the hole that locks the loom into working position.
6. Most Important Line! When weaving, the loom sits in your lap and sets on the edge of a table. That's what the cut-outs are for on the bottom of the back pieces. The front and back pieces are locked into an angle.
Lay the loom on its side: from the bottom of the front side of the loom to the center of the back side is 6". That is where it must be locked into place. So the second bolt is placed so that it goes through front, back and the rigid heddle support. Note the rigid heddle support is perpendicular to the floor when the loom is in weaving position. A picture is worth a thousand words, or several pictures.


7. The Dowels can now be inserted in the 1" holes. Sand the holes a little bigger if necessary and don't screw them in until you put the tension pegs in. the pegs should stick out of the dowel @3/4" on either side and be @1/8" away from the outside of the loom. When you insert the screw to the opposite end, leave it loose enough for the dowel to turn freely.
8. Finally, if you are going to install the Heddle Rod holders, they sit on the cross pieces (1 x 2's) of the loom. They do not have to be tight as the tension of the rods will hold them upright, so one small bolt and wing nut in each is all they need.
Heddle rods, beater and pickup sticks:


Here are a couple more pictures to help with assembly.


Sand all the parts very smooth. No fun when the fiber gets caught on something! Check out YouTube for great teaching videos! Evenually, I'll get some out there too, but no sense recreating the wheel.
Have Fun!
Let me know if I made any blunders in my explanation!