this is my first attempt at weaving double width on my homemade, 12”folding loom. There will be much experimentation with weaving double as I’ve seen beautiful motifs done this way (the weaving doesn’t open up, but it forms a thick beautiful fabric, and I want to create rich natural fabrics covered with nature’s designs. Birds, fish, turtles, flowers...
For this first attempt, I want to create a bag, aka a tube with the bottom closed. I’m still working with crochet cotton as I’ve not yet used up my stash and refuse to start buying weaving fibers until I do! So, for the warp I’m using #5 artiste 100% acrylic crochet thread - hm, I thought I bought all cotton crochet thread x in 40 curry, and for the weft I’ll be using 100% poly that I punched in Progresso Mexico as it has proven itself to be a beautiful weaving fiber. It’s very fine, so I may weave a double weft. We’ll see as I progress.
As usual, I don’t want to follow directions which have you warp up two different colors, one for the front, and one for th back as I want the finished bag to be the same all the way around. So to keep my threads separate, I warped 8.5” on my 13 dent rigid heddle heddle and inserted a pickup stick before returning with the second layer of threads. In all there will be 92 threads across per layer. I’m using the quick warping method, which is: tie the beginning warp thread to the rear apron Rod, then pull the thread through the first slit designated for the project out to a clamp on a table and around. This puts two threads through the slit. Return and bring the thread over and then under the apron Rod and back to the next slit in the heddle...
This is what it looks like from the back.
Threading and tie up would be a mess with all the ends together, so I inserted a pickup stick between the two layers, passed a contrasting thread through and tied it off. Now I can safely take the top layer off so I can thread the hole in the bottom layer. Looking at this, I think I should have tied off and threaded the hole before adding the top layer of threads. Yes, that would have been easier, but if I clip the big loop of the bottom layer, I can take one end and starting from the right, put one end through
the hole to the right. Then take the two threads that are still connected from the top layer that are in
the same hole and pull them from the bundle- they get tossed over the top. The final thread in the slot
gets moved to the right and out of the way. Now, pull the top threads for the next slot out of the bundle and flip them over the top. Take one bottom end and thread it through the hole. Take the final
thread to the right. This works. Threads to the top for top layer, and threads to the right for bottom layer.
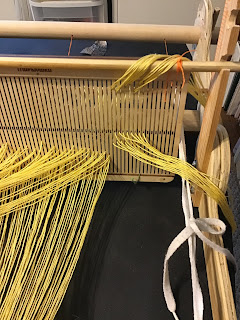
The pickup stick divider had to be removed, so I just re-inserted it after threading all the holes for the bottom layer.. now to do the tie-up.
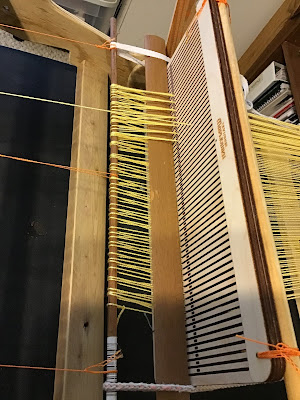
I had wanted to weave both layers together for about an inch, but the weaving had other ideas. I think my warp is too large for this 13 dent heddle, but it’s the only one I have, so.... after some thought and trial and error, I placed my top layer on two heddle rods and fabricated heddle rods supports which I attached to my looms frame behind the main heddle support.
I also found the warp not wanting to pass each other in the slots, so I insert an another heddle Rod
between the heddle rods to simplify separating sheds. Sometimes I have to insert a second heddle Rod after doing the first pick to get my shed to open. I found there was no need for the original pickup stick between the upper and lower layers once the heddle rods were in place, but don’t remove them prior to that!
So the sequence is:
1. Begin with the rigid heddle in the up position and the heddle rods up. Pass shuttle. Beat.
2. Drop the back heddle rods out of use, possibly beat again to help separate sheds. If the shed still won’t separate, take a thin pickup stick and pass it between the rigid heddle and heddle rod holder and below the heddle rod closest to you - the one still on the rod holder. Then you can push it down and the shed will separate. The rigid heddle should be in the down position. I’m thinking some things are just better done on a 4 shaft loom. This is tedious and persnickety. It is doable though, but get out your patience! Pass the shuttle, beat.
3. Put the first heddle rod down, the back heddle rod up and the pickup stick forward (right behind the rigid heddle) this will force heddle rod #1’s threads down and open a nice shed. (Be sure to remove the skinny pickup stick) rigid heddle is in the down position. Pass the shuttle, beat.
4. Both heddle rods up, pickup stick pushed back, rigid heddle down. The final shed is the one on the bottom.
So you start with the top shed of the bottom layer, then do both sheds of the top layer, and end with the lower shed of the bottom layer. Easy! Check the opening from the side to be sure both layers are there and not mixing!
The lower shed is the final step.
See the opening!


